本課程展示如何結合實體按鈕及觸感引腳將 ESP32 從深度睡眠中喚醒。ESP32 將使用 Arduino IDE 進行編程。
ESP32 可以使用多種喚醒源從深度睡眠中喚醒:定時器、外部喚醒和觸摸喚醒。本文介紹如何使用觸摸喚醒。
要了解有關深度睡眠和其他喚醒來源的更多信息,您可以按照以下教程進行操作:
內容目錄
Toggle寫一個深度睡眠素描
要編寫一個草稿圖以使您的 ESP32 進入深度睡眠模式,然後將其喚醒,您需要:
- 首先,配置喚醒源。意思是要配置將喚醒 ESP32 的內容。您可以使用一個或組合多個喚醒源。本教程介紹如何使用觸摸引腳作為喚醒源。
- 您可以決定在深度睡眠期間關閉或繼續使用哪些外圍設備。但是,預設情況下,ESP32 會自動關閉您定義的喚醒源不需要的外圍設備。
- 最後,您使用esp_deep_sleep_start()使您的 ESP32 進入深度睡眠模式的功能。
觸摸喚醒
ESP32 有 10 個電容式觸摸 GPIO。這些 GPIO 可以感應任何帶有電荷的物體的變化,例如人體皮膚。因此,他們可以檢測用手指觸摸 GPIO 時引起的變化。這些 ESP32 觸摸引腳可用於將 ESP32 從深度睡眠中喚醒。

觸摸引腳
ESP32 觸摸引腳在下圖中以引腳顏色突出顯示。
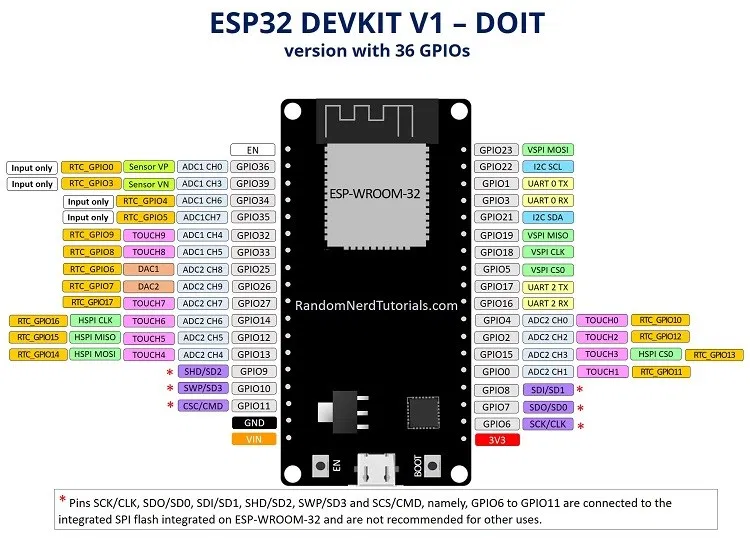
您可以看到觸摸傳感器 0 對應 GPIO 4,觸摸傳感器 2 對應 GPIO 2,依此類推。
啟用觸控喚醒
使用觸摸引腳使 ESP32 喚醒很簡單。在 Arduino IDE 中,您需要使用以下函數:
esp_sleep_enable_touchpad_wakeup()程式碼 - 觸摸喚醒
/*
Deep Sleep with Touch Wake Up
=====================================
This code displays how to use deep sleep with
a touch as a wake up source and how to store data in
RTC memory to use it over reboots

This code is under Public Domain License.

Author:
Pranav Cherukupalli <cherukupallip@gmail.com>
*/

#define Threshold 40 /* Greater the value, more the sensitivity */

RTC_DATA_ATTR int bootCount = 0;
touch_pad_t touchPin;
/*
Method to print the reason by which ESP32
has been awaken from sleep
*/
void print_wakeup_reason(){
  esp_sleep_wakeup_cause_t wakeup_reason;

  wakeup_reason = esp_sleep_get_wakeup_cause();

  switch(wakeup_reason)
  {
    case ESP_SLEEP_WAKEUP_EXT0 : Serial.println("Wakeup caused by external signal using RTC_IO"); break;
    case ESP_SLEEP_WAKEUP_EXT1 : Serial.println("Wakeup caused by external signal using RTC_CNTL"); break;
    case ESP_SLEEP_WAKEUP_TIMER : Serial.println("Wakeup caused by timer"); break;
    case ESP_SLEEP_WAKEUP_TOUCHPAD : Serial.println("Wakeup caused by touchpad"); break;
    case ESP_SLEEP_WAKEUP_ULP : Serial.println("Wakeup caused by ULP program"); break;
    default : Serial.printf("Wakeup was not caused by deep sleep: %d\n",wakeup_reason); break;
  }
}

/*
Method to print the touchpad by which ESP32
has been awaken from sleep
*/
void print_wakeup_touchpad(){
  touchPin = esp_sleep_get_touchpad_wakeup_status();

  switch(touchPin)
  {
    case 0  : Serial.println("Touch detected on GPIO 4"); break;
    case 1  : Serial.println("Touch detected on GPIO 0"); break;
    case 2  : Serial.println("Touch detected on GPIO 2"); break;
    case 3  : Serial.println("Touch detected on GPIO 15"); break;
    case 4  : Serial.println("Touch detected on GPIO 13"); break;
    case 5  : Serial.println("Touch detected on GPIO 12"); break;
    case 6  : Serial.println("Touch detected on GPIO 14"); break;
    case 7  : Serial.println("Touch detected on GPIO 27"); break;
    case 8  : Serial.println("Touch detected on GPIO 33"); break;
    case 9  : Serial.println("Touch detected on GPIO 32"); break;
    default : Serial.println("Wakeup not by touchpad"); break;
  }
}

void callback(){
  //placeholder callback function
}

void setup(){
  Serial.begin(115200);
  delay(1000); //Take some time to open up the Serial Monitor

  //Increment boot number and print it every reboot
  ++bootCount;
  Serial.println("Boot number: " + String(bootCount));

  //Print the wakeup reason for ESP32 and touchpad too
  print_wakeup_reason();
  print_wakeup_touchpad();

  //Setup interrupt on Touch Pad 3 (GPIO15)
  touchAttachInterrupt(T3, callback, Threshold);

  //Configure Touchpad as wakeup source
  esp_sleep_enable_touchpad_wakeup();

  //Go to sleep now
  Serial.println("Going to sleep now");
  esp_deep_sleep_start();
  Serial.println("This will never be printed");
}

void loop(){
  //This will never be reached
}
設置閾值
您需要做的第一件事是為觸摸引腳設置閾值。在這種情況下,我們設置臨界點到 40。您可能需要根據您的項目更改閾值。
#define Threshold 40當您觸摸觸摸感應 GPIO 時,感測器讀取的值會減小。因此,您可以設置一個閾值,以便在檢測到觸摸時發生某些事情。
這裡設置的閾值意味著當觸摸感應GPIO讀取的值低於40時,ESP32應該被喚醒。您可以根據所需的靈敏度調整該值。
附加中斷
您需要將中斷附加到觸感引腳。當在指定的 GPIO 上檢測到觸摸時,將執行回調函數。例如,看一下以下行:
//Setup interrupt on Touch Pad 3 (GPIO15)
 touchAttachInterrupt(T3, callback, Threshold);
當在 T3 上讀取的值 (通用輸入輸出接口 15) 低於上設置的值臨界點變量,ESP32 喚醒和callback功能被執行。
這callback()僅當 ESP32 處於喚醒狀態時才會執行該函數。
- 如果 ESP32 處於睡眠狀態並且您觸摸 T3,ESP 將喚醒 –callback()如果只是按下並釋放觸摸針,功能將不會執行;
- 如果 ESP32 處於喚醒狀態並且您觸摸 T3,則會執行回調函數。所以,如果你想執行callback()喚醒 ESP32 時,您需要按住該引腳上的觸摸一段時間,直到該功能被執行。
在這種情況下callback()函數為空。
void callback(){
  //placeholder callback function
}
如果您想使用不同的觸摸引腳喚醒 ESP32,您只需將中斷附加到這些引腳。
接下來,您需要使用esp_sleep_enable_touchpad_wakeup()功能將觸摸引腳設置為喚醒源。
//Configure Touchpad as wakeup source
esp_sleep_enable_touchpad_wakeup()
示意圖
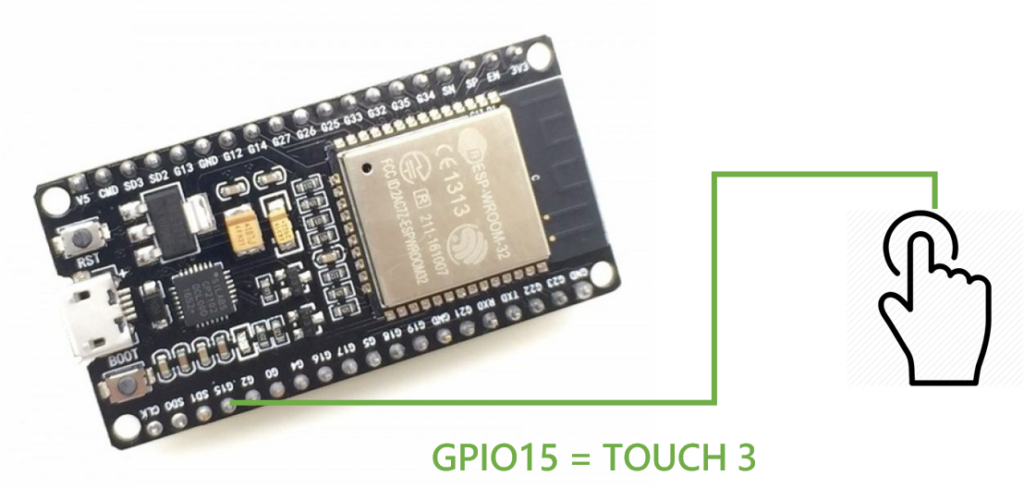
要測試此範例,請將電路連接到通用輸入輸出接口 15,如下圖所示。
測試範例
將程式碼上傳到您的 ESP32,並以 115200 的鮑率打開序列埠監控視窗。

ESP32 進入深度睡眠模式。
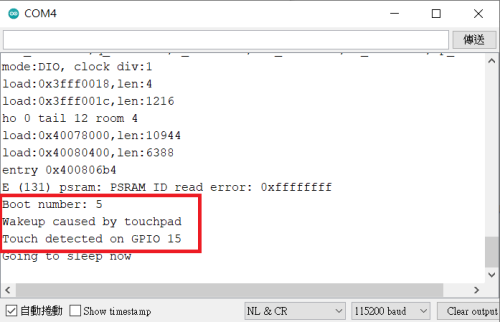
您可以通過觸摸連接到 Touch Pin 3 的電線將其喚醒。
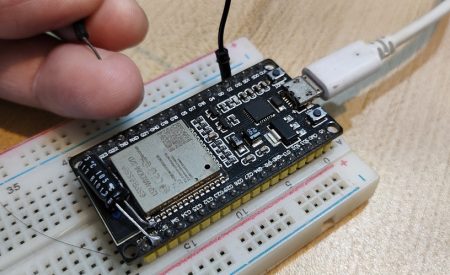
當您觸摸該引腳時,ESP32 會在序列埠監控視窗上顯示:啟動號、喚醒原因以及檢測到 GPIO 觸摸的位置。
總結
在本文中,我們向您展示瞭如何使用觸摸感應 GPIO 喚醒 ESP32。當在指定的 GPIO 上檢測到觸摸時,ESP32 會喚醒並運行回調函數。之後,它又重新進入睡眠狀態。
您可以通過我們的完整指南了解有關使用 ESP32 進行深度睡眠的更多信息:使用 Arduino IDE 和喚醒源的 ESP32 深度睡眠。
